But my advice – steer clear of any of those special camera modes!
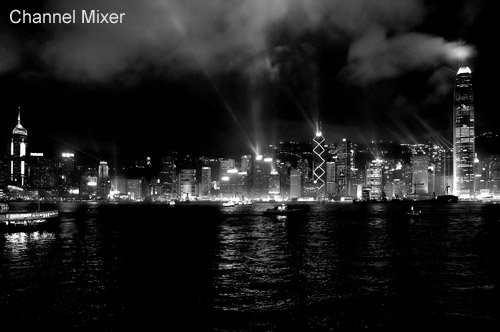
I'll show you why . . . roll your mouse over the photographs below (one was converted by the greyscale method, the other by using the "channel mixer").
If you would like your black and white digital photography to look more like the second photo, rather than the lifeless greyscale of the first photo, then read on.
Show us YOUR black and white pictures!
Submit your black and white photos, and share them with the world!
Submit your photo and we (and other visitors to the site) will be able to admire your original photography.
It will also give some 'black and white' ideas to others - and you'll be able to pick up some ideas from those who have already contributed too!
NB: any comments your photo(s) receive are screened before being posted on this site
Click to see submissions to date
Click to browse the submission archive
Before you get stuck into your black and white digital photography you might want to have a look at my black and white photography tip #1 which goes through a few basics on what sort of scenes work best for black and white digital photography, and what might be best avoided!
Greyscale vs true black and white digital photography
The photographs above are of Hong Kong at night (great place to visit by the way, highly recommended!).
The first image is in greyscale. It looks lifeless compared to the punchy black and white of the second image.
To create top quality black and white digital photos like this I have used the channel mixer function in Photoshop.
Your camera software
To start with your camera though. It probably came with some photo editing software. You might have your own software – perhaps Photoshop, Photo Impact, Photo Studio – or any one of a dozen or so programs that have "photo" somewhere in the title!
Any of these will do a better job at black and white digital photography than your camera will.
 Think of it this way – your camera is specially designed to capture photographs. Your software is specially designed to edit photographs. Don’t ask your camera to do a job that your software is designed to do – it’s not what it was made for!
 And now for the science bit!
To explain in a little more detail:
Light is made up of many colours - think back to rainbows, prisms and "Richard Of York Gave Battle In Vain" at school.
NB: for the interested, the first letter of each word in the Richard . . . phrase represents the colours of the rainbow in order. R = red, Orange, Yellow, Green, Blue, Indigo, Violet.
When you capture an image with your digital camera the lens focuses light onto the image sensor.
The sensor is made up of millions of light sensitive dots. These are called “photosites” - just think of them as individual dots. Look at my pages on digital photography printing and Digital photography printing - understanding resolution for more on this.
Your sensor records three types of light – red, green and blue (RGB). It records the strength of each of these from a scale of 000-255.
So, a photosite might have a reading of:
Red – 212
Green – 028
Blue – 056
The strength of each colour is combined to get an overall colour for that dot. In this case, because red is the strongest colour, this will give us a reddish coloured dot.
NB: If all three were 000 that would be pure black, and if they were all 255 the result would be pure white.
And the maths part . . .
Now, think about all the information you have there. Three colours, with 256 possible strengths of colour.
Wow! Each dot can represent any one of over 16 million colours. That’s a lot of colours!
So what happens of you set your camera to black and white digital photography mode? It throws away all of those colours and simply records the strength of light at that pixel – on a scale of 000 – 256.
000 = pure black
255 = pure white
anything in the middle is grey.
This is the main reason why I implore you to not set your camera to black and white mode.
If you do you are asking your digital camera, that is capable of recording any one of over 16 million combinations to choose from just 256 of them. You’re basically throwing away information that you might just need later on.
Still not convinced?
More reasons? You may well decide later on that, actually, that picture might look better in colour.
If your camera never recorded the colour information when it took the photograph (i.e. it was set to black and white digital photography mode) you can't put the information back later on. It's gone for good.
If you decide to go for a black and white photograph anyway, then your software is more than capable of throwing away that information. At least you'll have the choice.
But wait! There’s more. Even if you have taken your full colour snap and decided that it suits black and white digital photography, tread carefully.
There are ways to make your black and white digital photography really stand out, and then there’s greyscale again. Go back to the two images at the top of this page to remind yourself why.
To create top quality black and white digital photos like these you need to use your photo editing software with a little care. I have used the channel mixer function in Photoshop.
Click for more on how to use Photoshop to produce the best black and white digital photography.
Немає коментарів:
Дописати коментар